

This week, I will share a little real-time shift in my hammer prep for hammer hanging. I still measure the distance from strike to hammer center at ends of sections and translate that to a cutoff line on the tails. When cut, the overall hammer length will then include 1 inch tails throughout the scale and custom bore lengths. Apart from reducing compromise in the regulation, this makes for one boring setup for all hammers, modified only by angle of bore. And the bore entry is set by wood of tail against capstan stop - very accurate. My two changes in procedure promote simplicity, safety, and better acknowledgement of materials. One is in cutting the tails and the other in finishing their coving.
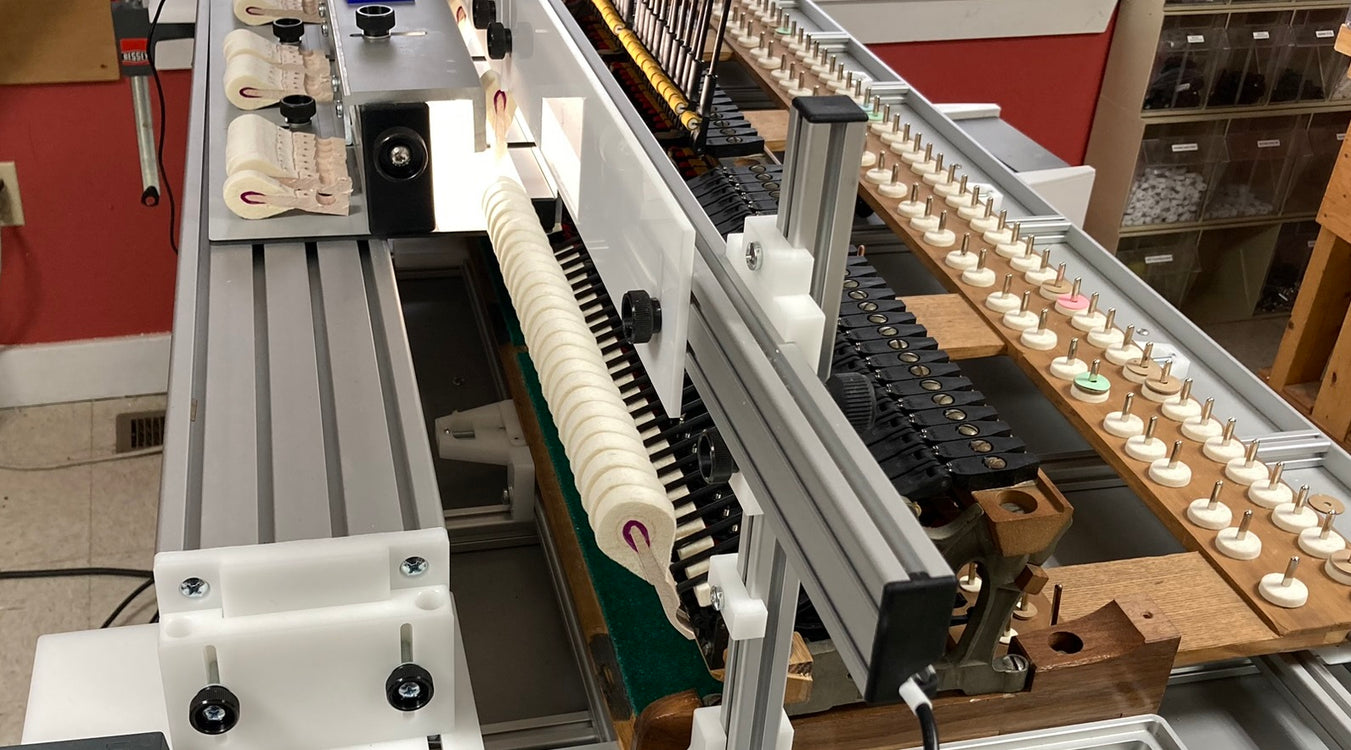
A few details from the lead photo will get us under way. Real strike-positioning relative to the action is essential for the custom bore tolerance to be tight enough to improve more than the most egregious discrepancies. A well-bedded keyframe, Keystep bedding and leveling samples, and weighted kissing samples of strike achieve this. Note in this photo the Regulating Rack with template rail set against upper leg stops in strike position. Once the bedding was reproduced on the bench, these templates were fine-tuned to strike height with the weighted kissing samples. Moving the rack so templates were directly over hammer centers, end-of-section measurements of bore distance were taken with digital calipers to the nearest .001". For practical purposes, that tolerance loosened to .01" when tail cutting and, in fact, I added just a little to anticipate immediate indentation from play. Key was that these measurements should follow the same overall profile to a tolerance of .001" so they don't contribute to accumulated error. I would, of course, still be a human drawing a pencil line and doing my best to cut to it. As you can see below, I clamped hammers together with a parallel-jawed clamp and tried to keep hammer crowns aligned. Parenthetically, you may notice that I borrowed an extra hammer from the bass section to become the extra for the first tenor section - its greater length was moot once cut.

Formerly, I would take this clamped section to my table saw and setup for a tricky cut that always was a relief to complete. I had just finished a one-tail cut with the new method in the photo below. The setup had two pieces of MDF fixed with double-sided-tape to my bandsaw bed. The second piece steadied the blade for greater precision. Earlier, I had fashioned a scrap piece of pine to sit on the MDF at the same height as the hammer tail with the rest of its thickness below grade away from the blade and cut to have its leading edge square to line of travel when contacting the side of the MDF. By sliding this slightly over-wide piece through the saw, its freshly cut side now indicated where the blade was, becoming a visual cue for cutting to the pencil line. By holding the tail to the jig's leading edge, it also was the fence that kept the tail's cut square. A small amount of sightline self-training made consistency easy. But apologies to self for the dullness of blade that scorched the endgrain.

Unfortunately, I motored through these next three steps without taking photos: boring the hammers, taking an initial .5" Forstner cut for their coving, and tapering their tails. These steps can be seen in a video on my YouTube channel. After boring but before tapering, I took a snug-fitting drill bit (shank substitute) and set up with a jig to achieve the Forstner cut in the right place and perpendicular to the shank. Later, when the tail is shaped, both inside and outside of tail will be parallel to backchecks, allowing maximum weight removal with no jeopardy to structure. Below, you can see the results of this work. For the tapering, I used a Spurlock Tapering Jig set up to take the small first amount off one side of the first tenor hammers. I divided my custom tapering into 7 groups, 2 to 7 incrementally taking a little more. Starting in the low tenor with 1, I switched approximately every 9 hammers. The increments backed out 1/4 turn of the side-stop screw that positions tail relative to blade. The increments proceeded to the high treble where after the second round, the finished width would be .260". The bass section started with 3 and ended with 5 so that the top bass hammer was significantly more tapered than the bottom tenor hammer - enough so that they weighed the same after all shaping was completed. When the first round of 7 increments was finished, some further turning out of screw was needed, about one full turn, fine-tuned by measuring trial cuts on the tail of hammer 89. From there, each change turned the screw in two 1/4 turns to move past the first cut at that stage by a 1/4 turn, resulting in tails with an equal amount removed from each side. This would make squaring hammers to vertical at strike easier later on, important for best voicing.

In preparation for hanging, I traveled shanks to vertical. A combination of Squaring Platform and Shank Traveler (shown below) made this easy. Yes, I probably had to travel every shank, but it was just a yes or a no over and over - a calming meditation that would simplify and optimize transfer of power from key to string.

Next, I added Hammer Hanging Jig to Squaring Platform and set up samples at strike (with help of Regulating Rack), held in place by a support rail (secured by the three black thumbnuts in the photo below). A little hard to see, but these samples had a thin strip of traveling paper (stripped Avery label) tightening the otherwise free unglued hammer fit. Then, I fine-tweaked the guiding rails so inside of tails just touched back side of support rail as rear shoulders just touched shoulder guide rail. After visual confirmation, I lifted and let drop each to hear shank tap support rail. The least bit off and a hammer will jam on one rail or the other and not tap. Note in the foreground of the photo the shoulder guide rail stop, secured by a large black thumbnut. Because these hammers were hung only 5.0" from their hammer centers, so much shank extends beyond hammer that they start catching on the guide rail only a few notes into the tenor section. No problem. I just loosened and slid back guiderail for gluing and rough positioning and returned it to confirm and test.

Hammers then went onto tray. And shank nibs were nipped off at the band saw.

Below, see one of my first jigs. I've shifted its positioning a little over the years but retained the same simple process it facilitates. The checking surface I sand straight into the grinder (120 open coat sandpaper), leaving tiny scratch lines that catch well but don't erode backcheck coverings. I use a 17-degree angle drawn on the jig relative to a line I make parallel to the grinding surface. The rest of the molding I grind as desired and pull across the disc for a smooth finish. The nail makes the shank travel easily and approximates the offset of knuckle and pin-end shank body so outside of molding and tail will be parallel to backchecks.

The other procedural change made was: Instead of finishing the inner tail shaping before hanging (shown in the above-mentioned video), I wait until all is firmly glued together and the most important outer shaping is in place. Before, I was pushing inverted tails into the drum to force removal, particularly over the bump at the edge of the Forstner boring. Now, with that boring as starting point, I can grind off the bump assertively with the drum pulling away from mistakes rather than pushing them at me. Going with the grain is easier to control, faster to complete, and the jig surface that supports the shank guarantees the result will be parallel to the outer tail.

Following completion of the coving, I touched the center of each WNG shank hole with a countersink to remove the little bit that won't sand off and cleaned up the inevitable breakout of tail wood left behind from grinding, particularly softening the side and bottom tail edges so they won’t damage backcheck coverings. Then, shank-by-shank, I checked their pinning for the 9 half-swings that I believe balance interests of control and freedom, tone and repetition. The swing test allocates more support for heavier hammers improving tone without constraining repetition and more freedom for lighter hammers improving both repetition and tone. I adjusted those that were loose with the tip of a Mannino broach (the same as I do for cloth bushings) and those that were tight with Protek CLP from a fine-tipped oiler. When first out of the box, I had taken the precaution of sorting the shanks by friction, 3 grams in the low bass to 1.5 grams in the high treble. It took a few minutes but provided very close to the 9 half-swings I was looking for. I proceeded cautiously with the broach work and started on one side with the CLP (second side and inner sides adding further relief as needed). I then vigorously wagged the shanks, flicking their flanges back and forth at speed, before testing. In the end no re-pinning was needed to bring all into compliance. Note in the photo below, how the inside and outside tail shapes of these flared tenor hammers are parallel. My scorched ends show it nicely.

Next time: Mason A Regulating - First Pass
(Index of all articles in this series)
Be the first to comment